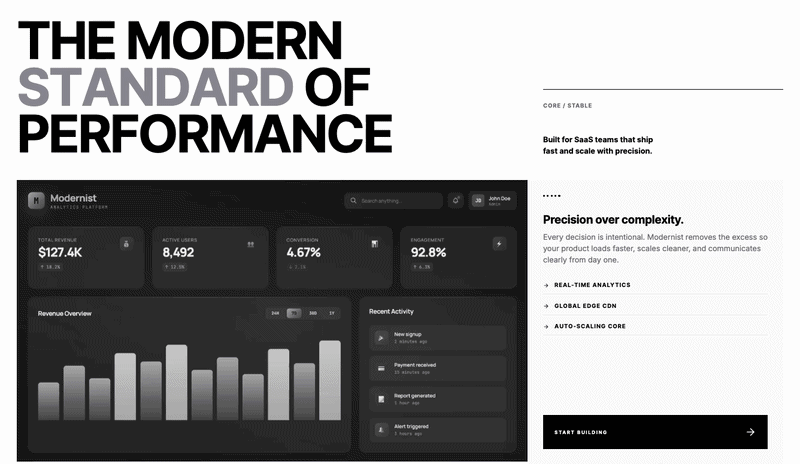
Responsive call-to-action(CTA) section built with HTML, CSS, and GSAP. Features a bold heading, a styled button, and stats that count up from zero with a scroll-triggered animation powered by ScrollTrigger. Clean dark theme design that works well as a closing section for landing pages and SaaS sites.
Final output:
Build the Future with Precision.
1. Let’s start with a section element with the class section-cta. Inside it, add a .cta-wrapper div with a .cta-left-wrapper and a .cta-right-wrapper inside it.
<section class="section-cta">
    <div class="cta-wrapper">
        <div class="cta-left-wrapper">
        </div>
        <div class="cta-right-wrapper">
        </div>
    </div>
</section>
Reset margins and set the font family on the body. Style .cta-wrapper with a black background, a grid background image, and a two-column grid layout for the CTA section. Set padding for spacing inside the wrapper.
* {
    margin: 0;
    box-sizing: border-box;
}
body {
    font-family: "Inter", sans-serif;
}
.section-cta {
    padding: 1.5rem;
}
.section-cta .cta-wrapper {
    background-color: #000;
    color: #fff;
    background-image: url("grid-lines.png");
    background-position: 50%;
    background-repeat: no-repeat;
    background-size: cover;
    display: grid;
    grid-template-columns: 2fr 1fr;
    gap: 3rem;
    padding: 6rem;
    line-height: 1.125rem;
}
On smaller screens, reduce the padding and switch the grid to a single column so the two sides stack on top of each other.
@media screen and (max-width: 991px) {
    .section-cta .cta-wrapper {
        padding: 4rem;
    }
}
@media screen and (max-width: 767px) {
    .section-cta .cta-wrapper {
        grid-template-columns: 1fr;
    }
}
@media screen and (max-width: 479px) {
    .section-cta .cta-wrapper {
        padding: 2rem;
    }
}
I am using Inter font here.
<link rel="preconnect" href="https://fonts.googleapis.com">
<link rel="preconnect" href="https://fonts.gstatic.com" crossorigin>
<link href="https://fonts.googleapis.com/css2?family=Inter:ital,opsz,wght@0,14..32,100..900;1,14..32,100..900&display=swap"
        rel="stylesheet">
Output:
2. Fill in .cta-left-wrapper with a tiny label, a heading, and a button wrapper.
<div class="cta-left-wrapper">
    <div class="tiny-label">Ready to begin?</div>
    <h2 class="cta-heading">Build the Future with<span class="is-gray"> Precision</span>.</h2>
    <div class="button-wrapper">
        <a href="#" target="_blank" class="cta-button">Schedule Demo</a>
    </div>
</div>
Use flexbox with flex-flow: column and a gap to stack the label, heading, and button vertically.
.section-cta .cta-left-wrapper {
    display: flex;
    gap: 1.5rem;
    flex-flow: column;
}
Style the tiny label with a small uppercase font, letter-spacing, and a muted color. This same style is reused for the labels under the stats later.
.section-cta .tiny-label {
    color: #71717a;
    letter-spacing: 1px;
    text-transform: uppercase;
    font-size: .75rem;
    font-weight: 700;
}
Output:
Build the Future with Precision.
3. Style the heading. Use clamp() so the font size scales smoothly between screen sizes. Add a negative letter-spacing to tighten the large uppercase text, and a tight line-height of 0.95 to keep it compact.
.section-cta .cta-heading {
    letter-spacing: -4.8px;
    font-size: clamp(3.25rem, 6vw + 1rem, 6rem);
    line-height: .95;
    font-weight: 700;
    text-transform: uppercase;
    margin-block: 0;
}
On mobile, reduce the letter-spacing and font size further so the heading doesn’t overwhelm the smaller screen.
@media screen and (max-width: 479px) {
    .section-cta .cta-heading {
        letter-spacing: -2.75px;
        font-size: clamp(2.5rem, 3vw + 1rem, 2.75rem);
    }
}
Style the .is-gray span with a muted color and italic styling to create contrast against the bold white text.
.section-cta .cta-heading .is-gray {
    color: #909099;
    font-style: italic;
}
Output:
Build the Future with Precision.
4. Let’s style the button wrapper and button. Add top margin to space it from the heading. Use display: inline-block since anchor tags are inline by default, which means padding and margin won’t apply correctly without it. Add a hover state with a subtle opacity change for feedback.
.section-cta .button-wrapper {
    margin-top: 1.5rem;
}
.section-cta .cta-button {
    display: inline-block;
    text-decoration: none;
    border: 1px solid #000;
    background-color: #fff;
    color: #000;
    text-align: center;
    padding: 1.25rem 2.5rem;
    letter-spacing: 2px;
    text-transform: uppercase;
    font-size: .75rem;
    font-weight: 700;
    line-height: 1.5;
    cursor: pointer;
    transition: opacity .2s cubic-bezier(.645, .045, .355, 1);
}
.section-cta .cta-button:hover {
    background-color: #fafafa;
    opacity: .8;
}
Output:
Build the Future with Precision.
5. Now fill in .cta-right-wrapper with three .stats-block divs that will hold the number counter stats, each containing a .stats-wrapper with two stat numbers and a label below it.
<div class="cta-right-wrapper">
    <div class="stats-block">
        <div class="stats-wrapper">
            <div class="stats">99.99</div>
            <div class="stats">%</div>
        </div>
        <div class="tiny-label">Uptime Guarantee</div>
    </div>
    <div class="stats-block">
        <div class="stats-wrapper">
            <div class="stats">40</div>
            <div class="stats">+</div>
        </div>
        <div class="tiny-label">Global Regions</div>
    </div>
    <div class="stats-block">
        <div class="stats-wrapper">
            <div class="stats">24</div>
            <div class="stats">/7</div>
        </div>
        <div class="tiny-label">Expert Support</div>
    </div>
</div>
Use flexbox with flex-flow: column on .cta-right-wrapper to stack the stat blocks, and align-items: flex-end to right-align them on desktop.
.section-cta .cta-right-wrapper {
    flex-flow: column;
    justify-content: center;
    align-items: flex-end;
    display: flex;
    gap: 3rem;
}
On mobile, reduce the gap. On tablet, switch the alignment to flex-start so the stats left-align when stacked below the heading.
@media screen and (max-width: 479px) {
    .section-cta .cta-right-wrapper {
        gap: 2rem;
    }
}
@media screen and (max-width: 767px) {
    .section-cta .cta-right-wrapper {
        justify-content: center;
        align-items: flex-start;
    }
}Build the Future with Precision.
6. Style each .stats-block and right-align the text. Use flexbox on .stats-wrapper to lay the number and its suffix side by side. Give the stat number a large font size and bold weight to make it stand out.
.section-cta .stats-block {
    text-align: right;
}
.section-cta .stats-wrapper {
    display: flex;
    justify-content: flex-end;
    align-items: flex-start;
    margin-bottom: .25rem;
}
.section-cta .stats {
    font-size: 2.25rem;
    font-weight: 700;
    line-height: 1.1;
}Build the Future with Precision.
7. Now for the counting-up animation powered by GSAP ScrollTrigger. Link the GSAP and ScrollTrigger libraries just before the closing body tag, then link a separate script.js file after them. Keeping the animation logic in its own file keeps the HTML clean and makes the script easier to reuse.
<script src="https://cdn.jsdelivr.net/npm/gsap@3.15/dist/gsap.min.js"></script>
<script src="https://cdn.jsdelivr.net/npm/gsap@3.15/dist/ScrollTrigger.min.js"></script>
<script src="script.js"></script>
In script.js, register the ScrollTrigger plugin first. Then select every first .stats element inside each .stats-wrapper, since that’s the actual number, the second .stats div is just the %, +, or /7 suffix.
gsap.registerPlugin(ScrollTrigger);

document.querySelectorAll(".stats-wrapper .stats:first-child").forEach((stat) => {
    // animation logic goes here
});
Inside the loop, read the target number from the element’s text content using parseFloat. Also calculate how many decimal places the original number has, so 99.99 animates with two decimal places while 40 and 24 stay as whole numbers. Create a plain object called counter to hold the animated value, since GSAP needs a JavaScript object to tween, not the text content directly.
document.querySelectorAll(".stats-wrapper .stats:first-child").forEach((stat) => {
    const target = parseFloat(stat.textContent);
    const decimals = (stat.textContent.split(".")[1] || "").length;
    const counter = { value: 0 };
});
8. Finally, use gsap.to() to animate counter.value from 0 up to the target, creating the number counter effect. Set the scrollTrigger option so the animation starts when the stat scrolls into view, with trigger pointing to the element itself and start: “top 90%” triggering it just before it fully enters the viewport. In the onUpdate callback, which runs on every frame of the animation, update the element’s text content with the current counter value, rounded to the correct number of decimals.
gsap.to(counter, {
    value: target,
    duration: 1,
    ease: "power1.in",
    scrollTrigger: {
        trigger: stat,
        start: "top 90%",
    },
    onUpdate: () => {
        stat.textContent = counter.value.toFixed(decimals);
    },
});
Output:
Build the Future with Precision.
Final Output Code for Animated CTA Section with Number Counter Stats HTML CSS GSAP:
Head
<link rel="preconnect" href="https://fonts.googleapis.com">
<link rel="preconnect" href="https://fonts.gstatic.com" crossorigin>
<link href="https://fonts.googleapis.com/css2?family=Inter:ital,opsz,wght@0,14..32,100..900;1,14..32,100..900&display=swap"
        rel="stylesheet">
HTML
<section class="section-cta">
    <div class="cta-wrapper">
        <div class="cta-left-wrapper">
            <div class="tiny-label">Ready to begin?</div>
            <h2 class="cta-heading">Build the Future with<span class="is-gray"> Precision</span>.
            </h2>
            <div class="button-wrapper"><a href="#" target="_blank" class="cta-button">Schedule
                    Demo</a>
            </div>
        </div>
        <div class="cta-right-wrapper">
            <div class="stats-block">
                <div class="stats-wrapper">
                    <div class="stats">99.99</div>
                    <div class="stats">%</div>
                </div>
                <div class="tiny-label">Uptime Guarantee</div>
            </div>
            <div class="stats-block">
                <div class="stats-wrapper">
                    <div class="stats">40</div>
                    <div class="stats">+</div>
                </div>
                <div class="tiny-label">Global Regions</div>
            </div>
            <div class="stats-block">
                <div class="stats-wrapper">
                    <div class="stats">24</div>
                    <div class="stats">/7</div>
                </div>
                <div class="tiny-label">Expert Support</div>
            </div>
        </div>
    </div>
</section>
CSS
* {
    margin: 0;
    box-sizing: border-box;
}
body {
    font-family: "Inter", sans-serif;
}
.section-cta {
    padding: 1.5rem;
}
.section-cta .cta-wrapper {
    background-color: #000;
    color: #fff;
    background-image: url("grid-lines.png");
    background-position: 50%;
    background-repeat: no-repeat;
    background-size: cover;
    display: grid;
    grid-template-columns: 2fr 1fr;
    gap: 3rem;
    padding: 6rem;
    line-height: 1.125rem;
}
@media screen and (max-width: 991px) {
    .section-cta .cta-wrapper {
        padding: 4rem;
    }
}
@media screen and (max-width: 767px) {
    .section-cta .cta-wrapper {
        grid-template-columns: 1fr;
    }
}
@media screen and (max-width: 479px) {
    .section-cta .cta-wrapper {
        padding: 2rem;
    }
}
.section-cta .tiny-label {
    color: #71717a;
    letter-spacing: 1px;
    text-transform: uppercase;
    font-size: .75rem;
    font-weight: 700;
}
.section-cta .cta-left-wrapper {
    display: flex;
    gap: 1.5rem;
    flex-flow: column;
}
.section-cta .cta-heading {
    letter-spacing: -4.8px;
    font-size: clamp(3.25rem, 6vw + 1rem, 6rem);
    line-height: .95;
    font-weight: 700;
    text-transform: uppercase;
    margin-block: 0;
}
@media screen and (max-width: 479px) {
    .section-cta .cta-heading {
        letter-spacing: -2.75px;
        font-size: clamp(2.5rem, 3vw + 1rem, 2.75rem);
    }
}
.section-cta .cta-heading .is-gray {
    color: #909099;
    font-style: italic;
}
.section-cta .button-wrapper {
    margin-top: 1.5rem;
}
.section-cta .cta-button {
    display: inline-block;
    text-decoration: none;
    border: 1px solid #000;
    background-color: #fff;
    color: #000;
    text-align: center;
    padding: 1.25rem 2.5rem;
    letter-spacing: 2px;
    text-transform: uppercase;
    font-size: .75rem;
    font-weight: 700;
    line-height: 1.5;
    cursor: pointer;
    transition: opacity .2s cubic-bezier(.645, .045, .355, 1);
}
.section-cta .cta-button:hover {
    color: #fafafa;
    opacity: .8;
}
.section-cta .cta-right-wrapper {
    flex-flow: column;
    justify-content: center;
    align-items: flex-end;
    display: flex;
    gap: 3rem;
}
@media screen and (max-width: 479px) {
    .section-cta .cta-right-wrapper {
        gap: 2rem;
    }
}
@media screen and (max-width: 767px) {
    .section-cta .cta-right-wrapper {
        justify-content: center;
        align-items: flex-start;
    }
}
.section-cta .stats-block {
    text-align: right;
}
.section-cta .stats-wrapper {
    display: flex;
    justify-content: flex-end;
    align-items: flex-start;
    margin-bottom: .25rem;
}
.section-cta .stats {
    font-size: 2.25rem;
    font-weight: 700;
    line-height: 1.1;
}
Footer(before </body>):
<script src="https://cdn.jsdelivr.net/npm/gsap@3.15/dist/gsap.min.js"></script>
<script src="https://cdn.jsdelivr.net/npm/gsap@3.15/dist/ScrollTrigger.min.js"></script>
JS:
gsap.registerPlugin(ScrollTrigger);

document.querySelectorAll(".stats-wrapper .stats:first-child").forEach((stat) => {
    const target = parseFloat(stat.textContent);
    const decimals = (stat.textContent.split(".")[1] || "").length;
    const counter = { value: 0 };

    gsap.to(counter, {
        value: target,
        duration: 1,
        ease: "power1.in",
        scrollTrigger: {
            trigger: stat,
            start: "top 90%",
        },
        onUpdate: () => {
            stat.textContent = counter.value.toFixed(decimals);
        },
    });
});
If you have any doubts or stuck somewhere, you can reach out through Coding Yaar's Discord server.